
Configuring a High Availability Cluster (Heartbeat) On CentOS:
This blog page shows how you can set up a two node, high-availability HTTP cluster with heartbeat on CentOS. Both nodes use the Apache web server to serve the same content. Let decryptinfo for the configuration:
Read Also: [Security Device] List of Top Fortinet FortiWeb Web Application Firewalls 2021
Pre-Configuration Requirements
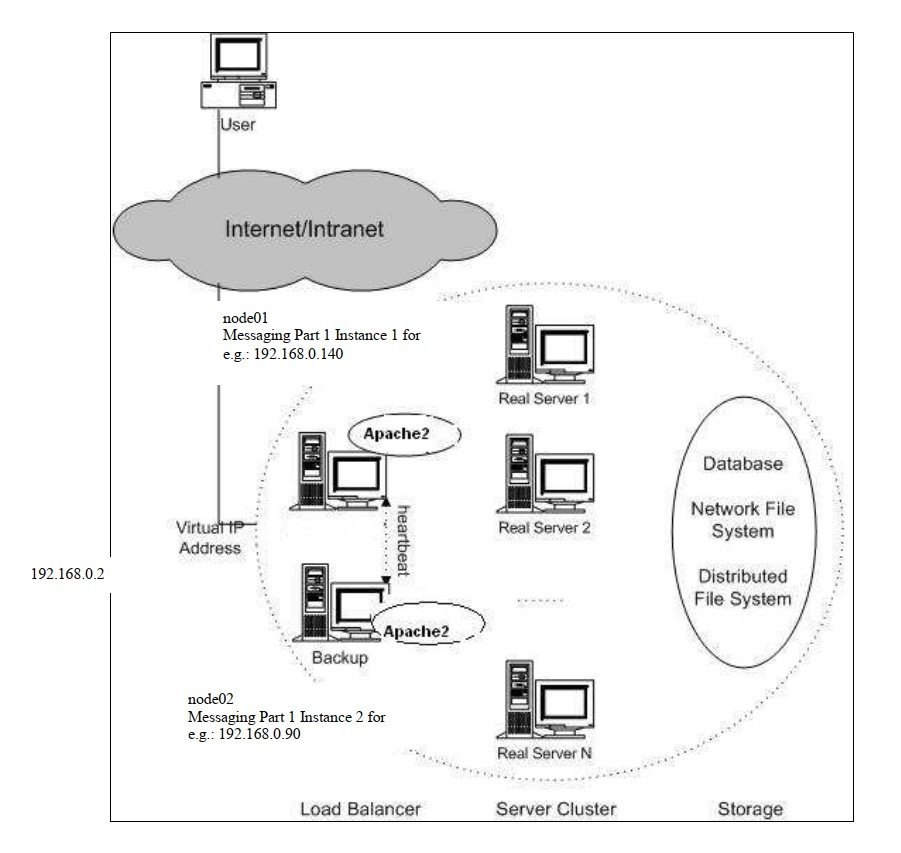
- Assign hostname node01 to primary node with IP address Messaging Part1 Server Instance 1 (For e.g.:192.168.0.90) to eth0.
- Assign hostname node02 to slave node with IP address Messaging Part1 Server Instance 2 (For e.g.:192.168.0.140).
Note: on node01
uname -nmust return node01.
Read Also: [Windows]Top 69 Windows 10 updated Run (start +R) Commands
On node02
uname -nmust return node02.
192.168.0. 2 is the virtual IP address that will be used for our Apache web-server (i.e., Apache will listen on that address).
Configuration
Download and install the heartbeat package. In our case we are using CentOS so we will
install heartbeat with yum:
yum install heartbeat
Now we have to configure heartbeat on our two node cluster. We will deal with three files. These are:
authkeys
ha.cf
haresources
Read Also: [Security] What is Web Application Firewall(WAF)? Top 10+ WAF 2021
Now moving to our configuration. But there is one more thing to do that is to copy these files to the /etc/ha.d directory. In our case we copy these files as given below:
cp /usr/share/doc/heartbeat-2.1.2/authkeys /etc/ha.d/

cp /usr/share/doc/heartbeat-2.1.2/ha.cf /etc/ha.d/

cp /usr/share/doc/heartbeat-2.1.2/haresources /etc/ha.d/
Now let’s start configuring heartbeat. First we will deal with the authkeys file, we will use authentication method 2 (sha1). For this we will make changes in the authkeys file as below.
vi /etc/ha.d/authkeysThen add the following lines:
auth 2
2 sha1 test-ha
Change the permission of the authkeys file:
chmod 600 /etc/ha.d/authkeysMoving to our second file (ha.cf) which is the most important. So edit the ha.cf file with vi:
vi /etc/ha.d/ha.cf
Read Also: How To Bypass Mega.nz 50GB Import Limit
Add the following lines in the ha.cf file:
logfile /var/log/ha-log
logfacility local0
keepalive 2
deadtime 30
initdead 120
bcast eth0
udpport 694
auto_failback on
node node01
node node02 */Note: node01 and node02 is the output generated by
uname -nThe final piece of work in our configuration is to edit the haresources file. This file contains the information about resources which we want to highly enable. In our case we want the webserver (httpd) highly available:
vi /etc/ha.d/haresourcesAdd the following line:
node01 192.168.0.2 httpdCopy the /etc/ha.d/ directory from node01 to node02:
scp -r /etc/ha.d/ root@node02:/etc/As we want httpd highly enabled let’s start configuring httpd:
vi /etc/httpd/conf/httpd.confAdd this line in httpd.conf:
Listen 192.168.0.2:80Copy the /etc/httpd/conf/httpd.conf file to node02:
scp /etc/httpd/conf/httpd.conf root@node02:/etc/httpd/conf/Create the file index.html on both nodes (node01 & node02):
On node01:
echo "node01 apache test server" > /var/www/html/index.htmlOn node02:
echo "node02 apache test server" > /var/www/html/index.htmlNow start heartbeat on the primary node01 and slave node02:
/etc/init.d/heartbeat startOpen web-browser and type in the URL:
http://192.168.0.2It will show node01 apache test server.
Read Also: Are You Looking For Defence Against FonixCrypter Ransomware 2021?
Now stop the hearbeat daemon on node01:
/etc/init.d/heartbeat stopIn your browser type in the URL http://192.168.0.2 and press enter. It will show node02 apache test server.
We don’t need to create a virtual network interface and assign an IP address (192.168.0.2) to it. Heartbeat will do this for you, and start the service (httpd) itself. So don’t worry about this.
Don’t use the IP addresses of Messaging Part1 Server Instance 1 and Instance 2 for services. These addresses are used by heartbeat for communication between node01 and node02. When any of them will be used for services/resources, it will disturb heartbeat and will not work. Be careful!!!
Read Also: Are You Looking For Defence Against FonixCrypter Ransomware 2021?
Installing Apache2
Apache2 is available as a CentOS package; therefore we can install it like this:
yum install httpdThe package httpd has some dependencies. So please install the below packages through DVD before httpd package installation.
Insert DVD-> Goto folder CentOS_5.5 -> CentOS and install packages by using below command
rpm -ivh apr-1.2.7-11.el5_3.1.x86_64.rpm
rpm -ivh apr-util-1.2.7-11.el5_3.1.x86_64.rpm
rpm -ivh httpd-devel-2.2.3-43.el5.centos.x86_64.rpm
and regarding the postgresql-libs package we need exactly the below mentioned version which is available from packages list of DVD only.
rpm -ivh postgresql-libs-8.1.18-2.el5_4.1If the postgresql-libs-8.3.3-1PGDG.rhel5.x86_64.rpm is already installed separately from DVD please remove the packages by using below command
rpm -e postgresql-libs-8.3.3-1PGDG.rhel5.x86_64.rpmand run the command as written below:
rpm -e --nodeps postgresql-libsand then install httpd package from the DVD
rpm -ivh httpd-2.2.3-43.el5.centos.x86_64.rpmNote: For Load Balancer configuration there is no need to install Postgresql server from the packages provided in DVD
Start Apache:
/etc/init.d/httpd startTo configure apache2 as load balancer we will use mod_jk module. To install mod_jk you will need to install supporting tools like httpd-devel. If the httpd-devel tools are not installed, install them first:
sudo yum -y install httpd-develCopy module binary mod_jk.so from SSDG DVD to /etc/httpd/modules
Add following lines to httpd.conf in /etc/httpd/conf/httpd.conf
#==================LoadBalancer================
# Load mod_jk module
# Update this path to match your modules location
LoadModule jk_module /etc/httpd/modules/mod_jk.so
# Declare the module for <IfModule directive> (remove this line on Apache 2.x)
# AddModule mod_jk.c
# Where to find workers.properties
# Update this path to match your conf directory location (put workers.properties
next to httpd.conf)
JkWorkersFile conf/workers.properties

# Where to put jk shared memory
# Update this path to match your local state directory or logs directory
JkShmFile /var/log/httpd/mod_jk.shm
# Where to put jk logs
# Update this path to match your logs directory location (put mod_jk.log next to
access_log)
JkLogFile /var/log/httpd/mod_jk.log
# Set the jk log level [debug/error/info]
JkLogLevel info
# Select the timestamp log format
JkLogStampFormat "[%a %b %d %H:%M:%S %Y] "
#==============================================

<VirtualHost 192.168.0.2:80>
ServerAdmin (Email address of Administrator For eg :ssdg@decryptinfo.com)
ServerName (Domain name for SSDG Messaging Service For eg: nsdgstaging.decryptinfo.com)
ErrorLog /var/log/httpd/error.log
ProxyRequests Off
ProxyVia Off
JkMount /* loadbalancer1
</VirtualHost>

workers.properties.
# Define list of workers that will be used

# for mapping requests
worker.list=loadbalancer1, status
# Define Node1
# modify the host as your host IP or DNS name.
worker.node1.port=8009
worker.node1.host=IP Address of Messaging Part 1 Server Instance 1 For eg:192.168.0.140
worker.node1.type=ajp13
worker.node1.lbfactor=1
worker.node1.redirect=node2
# Load-balancing behaviour
#For ex1.decryptinfo.com
worker.loadbalancer1.type=lb
worker.loadbalancer1.balance_workers=node1,node2
worker.loadbalancer1.sticky_session=1
# Define Node2
# modify the host as your host IP or DNS name.
worker.node2.port=8009
worker.node2.host= IP Address of Messaging Part 1 Server Instance 2 For
eg:192.168.0.90
worker.node2.type=ajp13
worker.node2.lbfactor=10
worker.node2.cachesize=10
#worker.node2.redirect=node3
#Status worker for managing load balancer
worker.status.type=status
In above workers.properties worker.node1.host & worker.node2.host point to the machine where gateway services are running i.e. IP Address of Messaging Part 1 Server Instance 1 and Instance 2 .
worker.node1.port & worker.node2.port must point to the AJP port of jboss @ssdg (default is 8009).
Read Also: How to Launch Paros Proxy GUI in Kali Linux 2021?
Restart apache2 with command:
/etc/init.d/httpd restart