
Visual Studio Code (VSCode) is a popular, open-source code editor that has become the go-to choice for many developers. It’s a lightweight, yet powerful tool that can handle a wide variety of programming languages and projects. It’s especially useful for those who work with multiple languages and platforms. If you’re an Ubuntu 22.04 user, you’ll be happy to know that installing VSCode on your system is a straightforward process. In this article, we’ll guide you through the steps to get Visual Studio Code up and running on your Ubuntu machine.
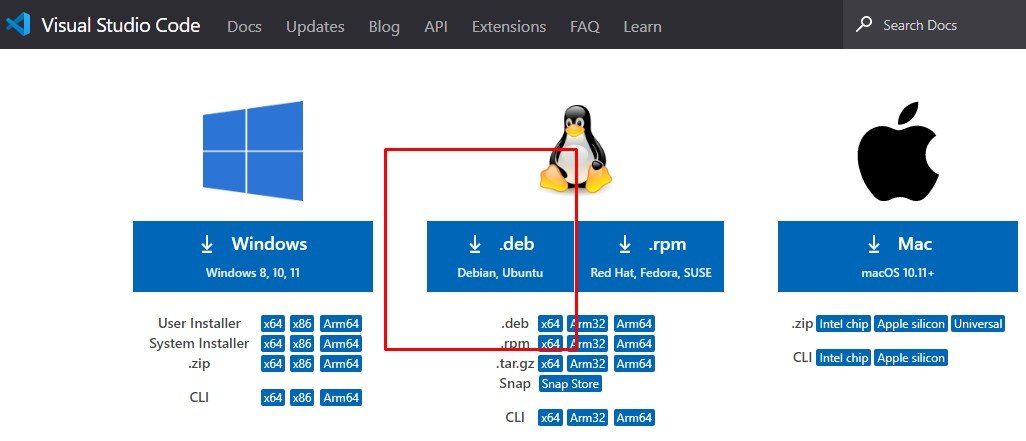
Step 1: Download the VSCode Debian Package
The first step in installing VSCode on Ubuntu is to download the Debian package. You can do this by visiting the official Visual Studio Code website and downloading the package for Linux. Once you’ve downloaded the package, you can move on to the next step.
Step 2: Install the Debian Package
Once you have the Debian package, you can install it using the terminal. Open the terminal and navigate to the directory where you’ve saved the package. Then, enter the following command:

This command will install Visual Studio Code on your system.
Step 3: Install Dependencies
In some cases, you may need to install dependencies before VSCode can be installed on your system. If this is the case, you’ll receive an error message after entering the previous command. To install the dependencies, simply enter the following command:

This command will install all of the required dependencies, and you should now be able to use Visual Studio Code on your system.
Step 4: Launch Visual Studio Code
Now that you have VSCode installed on your system, you can launch it from the terminal by entering the following command:

This will launch Visual Studio Code, and you’ll be able to start using it right away.
Step 5: Add the Visual Studio Code PPA
If you want to receive updates for Visual Studio Code, you can add the Visual Studio Code PPA to your system. To do this, enter the following commands:
sudo add-apt-repository ppa:formulahendry/code
sudo apt update
Once you’ve added the PPA, you’ll receive updates for Visual Studio Code whenever they’re available.
Don’t Miss:
- Word, Excel and Windows Shortcuts for beginners
- The Best Linux Distros for Programming in 2023
- This Phone Number is Banned- Telegram Error Message
- Get Cookin’ with Chef: A 6 Steps Guide to Deploy Chef on Linux
- How to Find Device or IP Address Using MAC Address
- How To Set Multiple temporary/Static IP Addresses In Linux
- Its all About Linux Kickstart Installation and PXE (Network) Installation
- 2022: How to Configuring Apache2 Load Balancer with failover mechanism
- 3 Free Credit Card Validator to check a card number is working or expire
- How To Bypass Mega.nz 50GB Import Limit
Step 6: Install Visual Studio Code Using Snap
Another option for installing Visual Studio Code on Ubuntu 22.04 is to use the Snap package manager. Snap is a package manager that makes it easy to install, update, and manage software on your system.
To install Visual Studio Code using Snap, simply enter the following command:
This will install Visual Studio Code on your system, and you’ll be able to start using it right away.
In this article, we’ve decrypt all the info to install Visual Studio Code on Ubuntu 22.04. Whether you choose to install it using the Debian package, the PPA, or Snap, the process is straightforward and easy to follow. With Visual Studio Code installed on your system, you can start developing your projects and taking your coding skills to the next level. Happy coding!